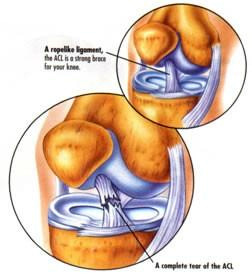
 The anterior cruciate ligament (ACL) is one of the main restraining ligaments in the knee. It runs through the centre of the knee from the back of the femur (thigh bone) to the front of the tibia (shin bone) and it acts as a link mechanism between the thigh and lower leg.
The main function of the ACL is in stabilising the knee especially in rotation movements and sidestepping, cutting or pivoting manoeuvres.
This means that when the ACL is ruptured or torn the tibia moves abnormally on the femur and almost jumps out of joint such that the knee buckles or gives way.
The main feeling is a sense of the knee giving way on twisting or pivoting movements and a feeling of not trusting the knee. It is usual for individuals to be able to return to walking and straight line running following a torn ACL but to not trust the knee on rough ground or twisting movements.
Q: DO YOU NEED A KNEE RECONSTRUCTION?
A: The main role of a cruciate reconstruction is to prevent your knee from giving way.
If you wish to return to pivoting or twisting sports you will need a new ligament.
If you are happy to reduce your activity levels and avoid twisting, you may cope without an ACL– building up your thigh and hamstring muscles will help. Some people will find that there knee gives way even with simple day to day activities; – if this is the case a reconstruction of the cruciate is required.
Braces are available as an option and some people wear them for limited periods, eg whilst snow skiing. They cannot be worn for contact sports and usually are not tolerated for regular use.
Q: WHAT HAPPENS IF I DON’T HAVE A RECONSTRUCTION?
A: If your knee does not give way, you will do well but may still develop arthritis (Usually after 20 or so years) as a result of the initial injury.
If your knee gives way, as well as limiting your activities and causing discomfort, over time (Often within 12 months) you are likely to tear or rupture one of your meniscal cartilages. This often requires arthroscopic surgery and may increase the chance of developing arthritis.
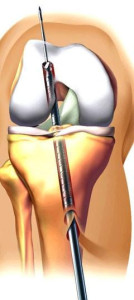
Q: WHAT IS INVOLVED IN A SURGICAL RECONSTRUCTION OF THE ANTERIOR CRUCIATE LIGAMENT?
A: Surgery can be performed anytime beyond the first week or two after the injury to allow the inflammation and pain from the injury to settle. You may spend some of this time in a brace, if you have ruptured another ligament (eg medial) Sometimes other ligament injuries necessitate earlier surgery.
Usually an MRI scan would be performed to plan treatment if injuries as well as the ACL rupture are apparent.
|
BEFORE OPERATIONPrior to surgery, Dr Sterling will see you and mark the leg. Any last minute questions can be answered. The nursing staff and physiotherapist may also visit you to explain the procedure.
|
AFTER THE OPERATIONON THE WARDWhen you return to the ward, you will be resting in bed. You will have a drip in your arm for fluids. You will have a bulky dressing over the wound on your knee. A physiotherapist will see you on the morning following surgery and teach you to walk fully weight bearing on that leg with crutches. Most people stay in hospital for one night; two nights is sometimes needed, usually if pain or post operative vomiting is a problem. Crutches are used for a few days. By three weeks most people would be comfortable in an office job, six weeks for an active job and three months for heavy work. The rehab involves ongoing physio – starting after two weeks when I have reviewed your wounds and knee. A detailed programme is outlined below..
At the end of the operation the knee is local anaesthetic is placed in the knee joint that lasts for up to 24 hours. It is not unusual for the knee to become more painful at around this time as the anaesthetic wears off. You will be supplied with strong oral analgesics (Tramal or Panadeine Forte) that may be required over the first few days. Please take these only as directed. Take one Aspirin tablet (300mg) each day for clot prevention. THE EARLY POSTOPERATIVE PERIOD
For the first ten days following the surgery, expect to be mobile at home using crutches, but resting otherwise, doing your exercises. After this your mobility will improve, but you should avoid any prolonged car or air travel for at least three weeks.
You will be commenced on a single aspirin tablet a day (300mg daily) to be taken with food. This will be continued for six weeks or until mobile, and is taken to help thin the blood slightly and prevent blood clots in the legs or elsewhere. You should do foot and ankle pumps for five minutes in each 1⁄2 hour
Dr Sterling’s secretary will usually make your first post operative appointment prior to your surgery. You need to see Dr Sterling ten to fourteen days following your operation. If you do not have an appointment please phone to make one.
Most people are fit to return to sedentary (Office) type employment after two to three weeks. Expect six weeks before being fully mobile and able to stand all day and up to three months for heavy manual work such as labouring or gardening etc. The basic expectation is that by;
SUCCESS OF SURGERY
IF YOU ARE CONCERNED:You may have moderate pain following the surgery and can take panadeine forte as provided or paracetamol. The pain should lessen each day. You should contact Dr Sterling (through the switchboard of the hospital where you had your surgery), or his |
REHABILITATIONPRE OPRehabilitation begins before surgery in the pre operative phase to ensure that you and your knee are ready for the operation.
OPERATIVE DAY
PAIN RELIEF FOLLOWING SURGERYThere are several strategies to reduce the discomfort following surgery. Essentially they include the following: nerve blocks which numb the leg for the first 12 – 18 hours, a Cryo cuff which is a cold water compression device to reduce swelling and pain, and anti-inflammatory painkillers and medication. INITIAL POST OPERATIVE PERIODYou will be able to go home the first postoperative day after a night in hospital. Patients stay overnight and start to move their knee on the morning after surgery under the instruction of the physiotherapist. On return from the operating theatre you will wake up with a bulky dressing A Cryo cuff (ice compression device) will be applied to the knee in order to keep the knee cool and reduce swelling. SUMMARY OF REHABILITATION PHASESThere are five main rehabilitation phases and example exercises for each phase are given in the sections that follow.
You will be reviewed at the following times in clinic and the goals for those stages are detailed:
INSTRUCTIONS ON DISCHARGE FROM WARDKeep the wound dry for 10-14 days or until the wound has sealed. Date for review in clinic after 2 weeks – wound review. Date for Outpatient physiotherapy appointment. Work Advice: to expect to be able to return as follows:
Driving Advice: To return to driving at 3 – 4 weeks depending on knee function. Instruction on use ice packs to control swelling. OUTPATIENT & HOME EXERCISE PROGRAMME: REHABILITATION PHASESThe rehabilitation phases and goals are presented below. There are many different exercises available to achieve the goals and these are tailored to each individual by the physiotherapy team. Various example exercises are outlined in each section. GENERAL PRINCIPLES FOR UNDERSTANDING THE REHABILITATION PROCESS.
1: Initial Post Op Phase – first 2 weeksAim The aim of this phase is to regain range of movement and to allow the swelling in the knee to settle. The most important aim is to regain normal and full extension (straightening) of the knee. The physiotherapist usually sees you one week following surgery to add in extra exercises. 1st Week Exercises
2nd Week Additional Exercises
2-Week Review Goals Range of motion: full terminal extension to 110° flexion. Wound healed. 2-Week Review Goals 2: Proprioception Phase – weeks 3 – 6Aim The aim of this phase is to work on proprioceptive exercises and to develop light endurance and strength training. This stage is also important for developing core stability to provide the framework to progress to full active function. By the end of six weeks your knee should feel normal in activities of daily living. Example Exercises
6-Week Review Goals 3: Strength Phase – Weeks 6 – 12Aim At six weeks the thigh muscle tone and definition (quadriceps / hamstrings) will be poor but the soft tissue hamstring graft will now have become solid within the femur and tibia tunnels such that more vigorous strength training can commence. Progress is monitored and controlled by the physiotherapist according to the speed of recovery of strength and control. Example Exercises
3 Months Review Goals 4: Early Sport Training Phase – 3 – 6 monthsAim Pivoting and cutting manoeuvres are introduced at this stage, building up to light sport training. This involves a progressive programme of slow and moderate speed strength training and agility drills. Manual work should be possible within the restraints of the occupation. Exercises for power and agility training are introduced. Month 3 Example Exercises
Months 4 – 6 Example Exercises Hard pivoting and cutting is introduced at this stage providing satisfactory progress with running training.
6 Months Review Goals 5: Return to Sport Phase – 6 – 9 monthsAim The aim of this phase is to progress sport training and to develop strength / endurance levels in order to establish a base for return to full sporting activity. This takes time, especially in building up confidence to progress to full contact activities. Return to contact sport is not recommended until strength and functional outcomes are measured at greater than 85% of the normal side. The time to regain pre injury level of skill and performance is very variable but can take 3 – 4 months of training and playing. Guidance from the physiotherapist in regaining confidence in a sport environment by modifying training and specific drills, can help with a quicker return to contact or full level sport competition.
|
 SURGERY
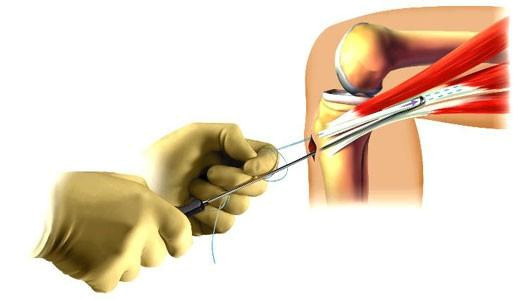

Remember:
If you have any queries or if you require any advice regarding your knee or the rehabilitation programme please do not hesitate to call your physiotherapist.